
-
Our offer is only for you if you are of legal age. Please confirm that you are at least 18 years old to proceed.
Our offer is only for you if you are of legal age. Please confirm that you are at least 18 years old to proceed.
Last updated on 05/08/2025 | Reading time approx. 11:12 min
There’s no question that bowl construction is the most important factor when it comes to extracting maximum flavor and dense smoke clouds from your hookah. Aside from bowl construction, it’s also essential that your hookah is completely airtight. We’ll assume this as a given. If it’s not airtight, you’ll draw in fresh air through the leaks, which can lead to flavor loss and less dense smoke.
To ensure you get the maximum flavor and smoke in your next hookah session, we’ve written this guide for the perfect bowl build! First, though, you’ll need to check what type of bowl you have at home so we can show you how to best prepare it.
Here are the options:
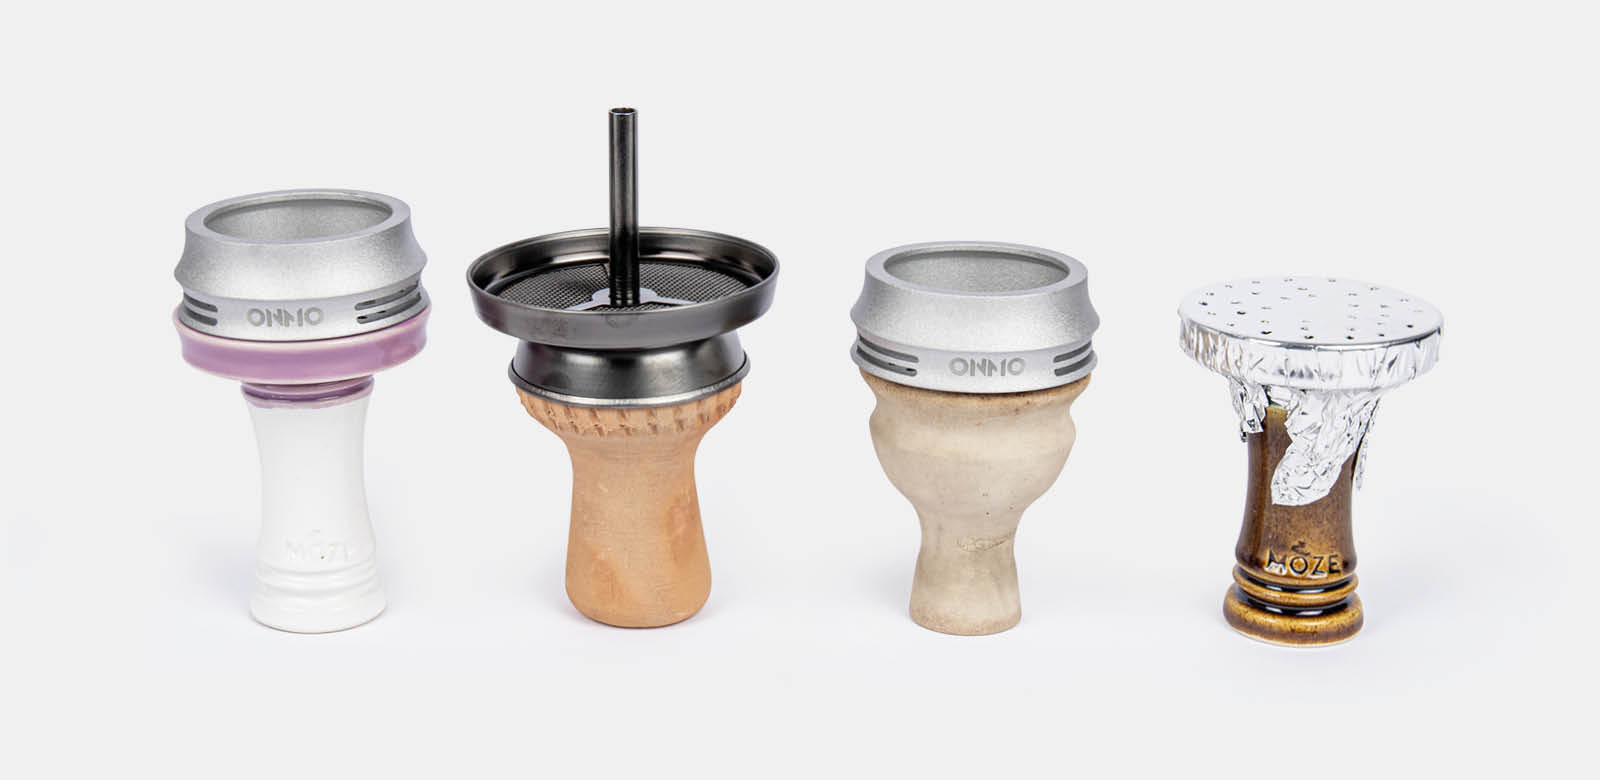
From left to right: Phunnel with smokebox, clay bowl with chimney, traditional bowl with smokebox, phunnel with aluminum foil
No matter what type of hookah bowl you’re using, you must stir the hookah tobacco thoroughly before placing it in the bowl. This ensures the molasses and its flavor are evenly distributed throughout the tobacco!
This applies not only to 200g hookah tobacco tins but also to the 25g tins, which have been the only available option since 2023. The liquid settles at the bottom, and if you don’t mix the tobacco, some parts will be too moist while others are too dry! So don’t skip this step!
Another tip: With hookah, the goal is not to burn the tobacco. Beginners often think more heat means more flavor, but that’s not the case.
The key is to heat the tobacco to the right temperature, not the highest possible! The ideal temperature can vary depending on the tobacco, but with experience, you’ll learn when to reduce the heat and when to add another coal.
The classic clay bowl typically refers to a traditional bowl made of reddish-brown clay. This is usually paired with a so-called chimney, on which the coals are placed. Alternatively, aluminum foil can be used. Now the question is: “How do I best build the bowl with a clay bowl and chimney or aluminum foil?” We’ll tell you!
After stirring the hookah tobacco, let it fall loosely into the clay bowl. It’s important not to follow the “more is better” principle here. If you pack the tobacco tightly to fit more in, you’ll block the pathways for hot air to draw through. This not only ruins the airflow but also the flavor!
The rule is: Distribute the tobacco as loosely as possible in the bowl! You should fill the bowl until the tobacco reaches the rim.
Let the tobacco fall loosely into the clay bowl.
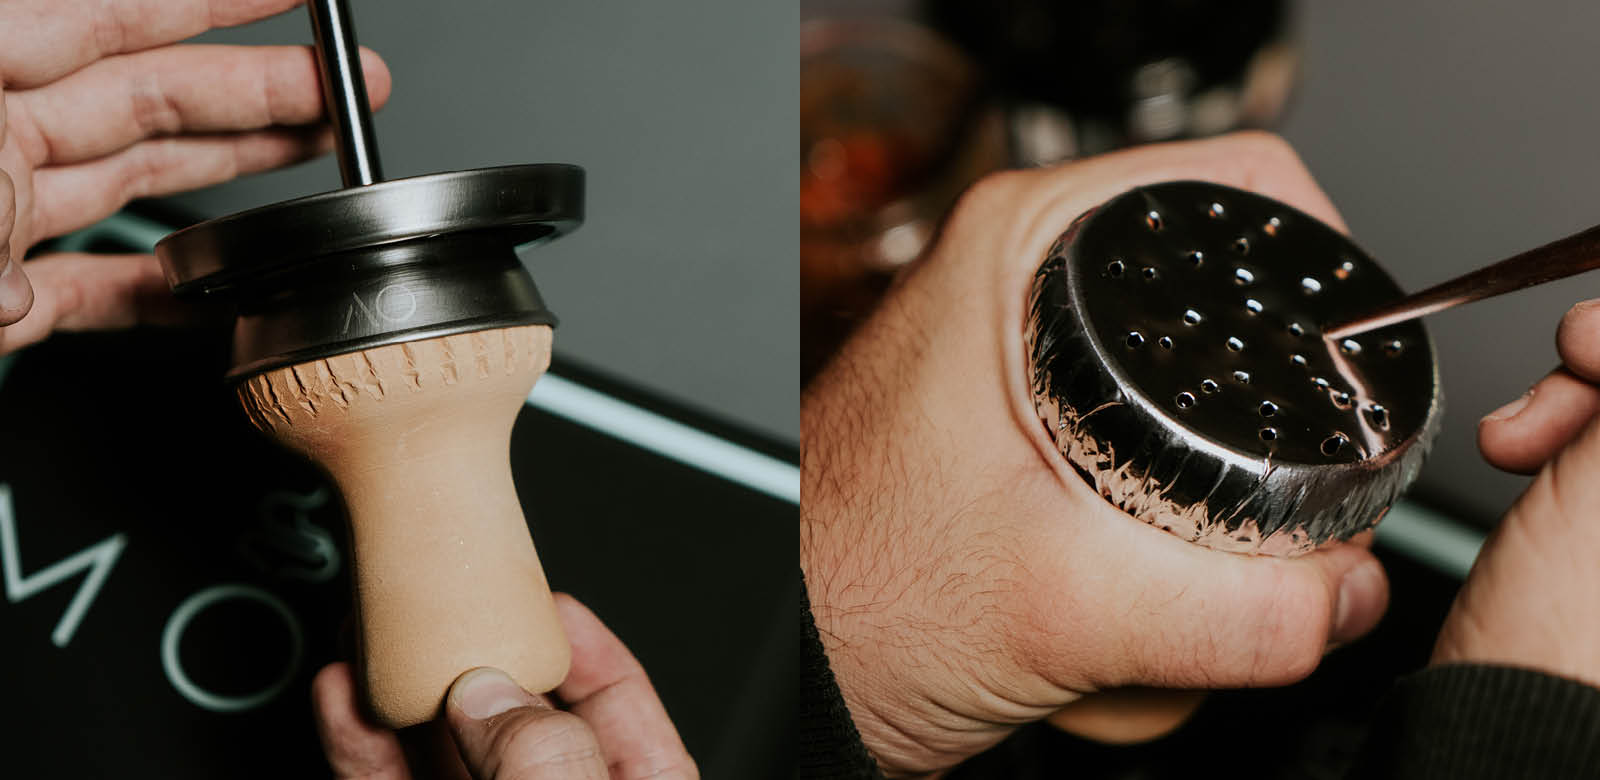
If you have a chimney for your clay bowl, simply place it on top and attach the bowl to your hookah.
With aluminum foil, a few more steps are needed before the bowl is ready. You’ll need either hookah armored foil or household aluminum foil (about 4 layers for sufficient thickness). Tear off a large square, fold it twice, and you’ll have a smaller square. Regardless of the foil you use, make sure it’s stretched tightly over the bowl.
Once the foil is tight, poke holes in it. You can use a specialized hookah poker, a toothpick, or a skewer. See the image for how it should look.
Chimney or aluminum foil
Before starting, check that the tobacco is loose enough by taking a test draw. Then, place the coals on the chimney or foil, and your hookah session can begin!
Today, the combination of a phunnel and smokebox (also called HMD or Heat Management Device) is the preferred setup for most hookah pros. This setup generally delivers better smoke and flavor than the classic clay bowl with chimney or foil.
If you don’t have this combo yet, consider getting it! Here’s how to prepare the bowl:
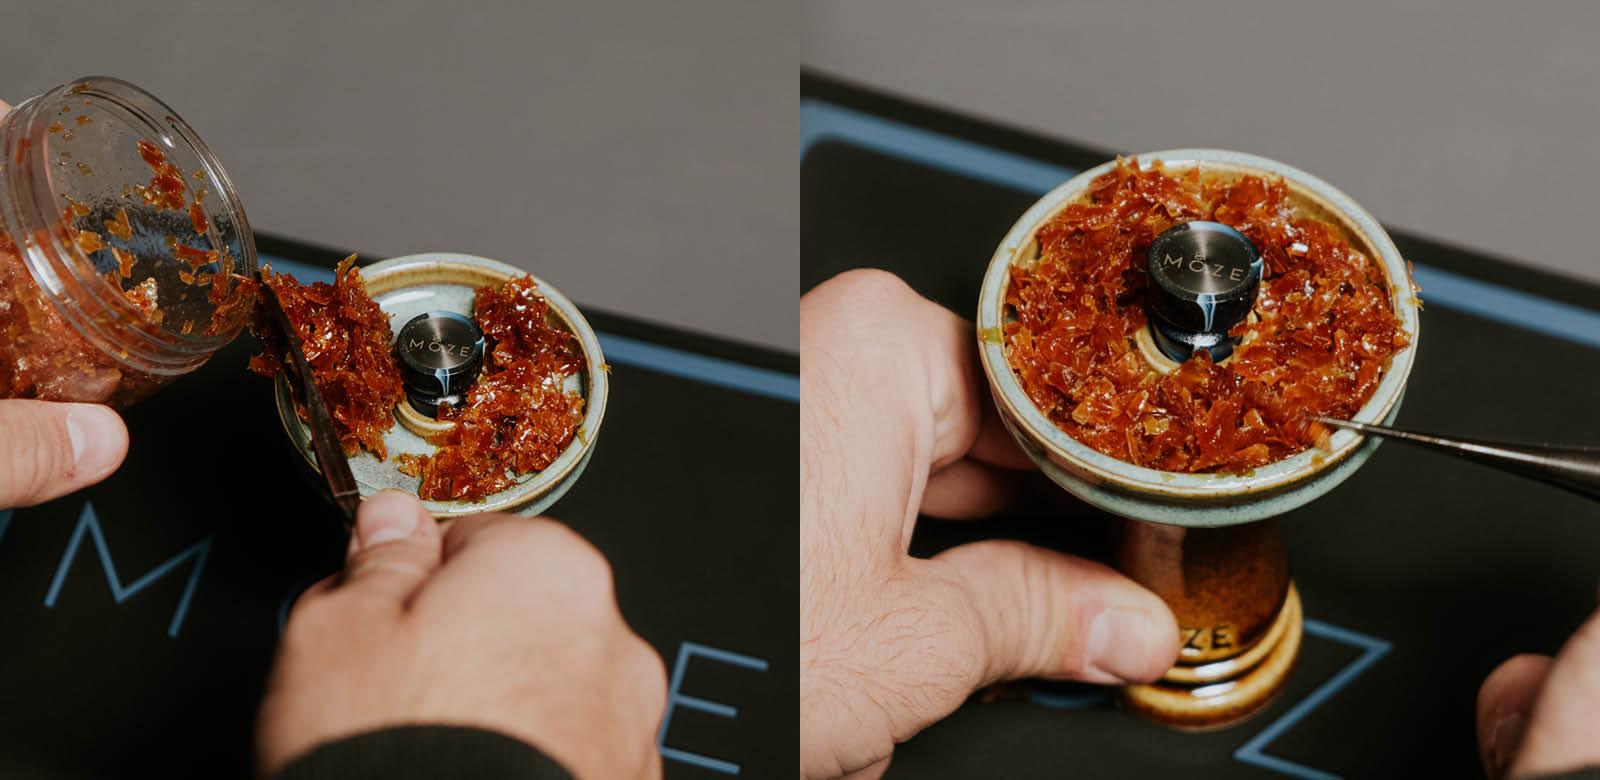
With a phunnel, spread the stirred tobacco around the central hole in the “trench.” Virginia (light) tobacco should always be placed loosely. Burley tobacco can be lightly pressed to slightly reduce its strength.
How high you pack the tobacco depends on experience. The rule of thumb: The higher the tobacco, the trickier the heat management. If it’s your first time using a phunnel with a smokebox, we recommend the ONMO HMD or Kaloud Lotus, as these have nubs or bars at the base for slight tobacco contact.
As a beginner, you should aim for minimal contact. Full contact with the smokebox base can overheat and burn the tobacco quickly.
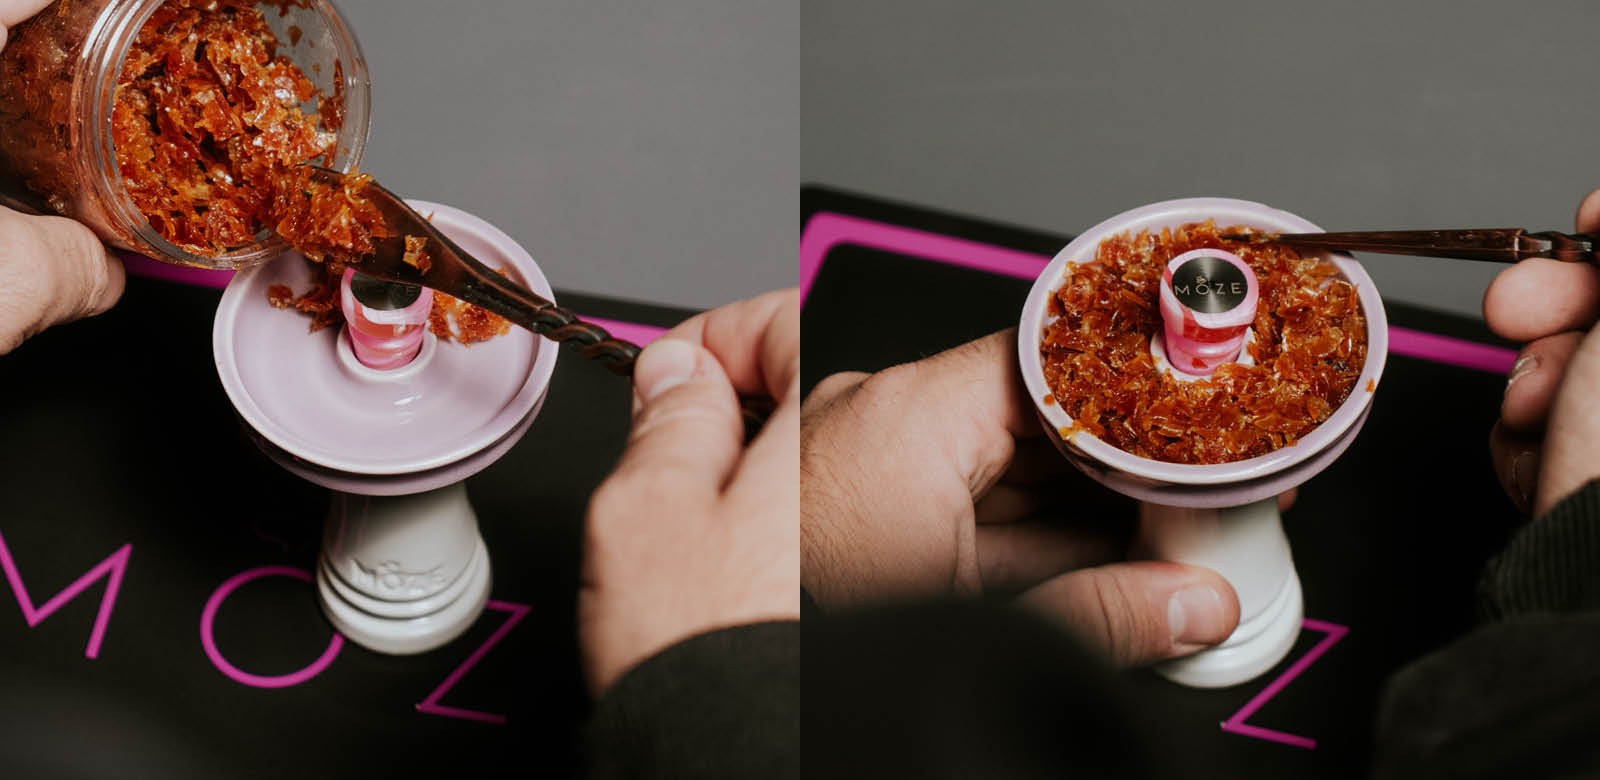
Let the tobacco fall loosely into the bowl.
Once the bowl is packed, attach it to your hookah and place the smokebox on top. Add the glowing coals to the smokebox and wait 2–3 minutes before the first draw to let it heat up.
We don’t recommend speeding up this process by placing the HMD on the coal burner. This can melt the smokebox or cause the tobacco to burn immediately.
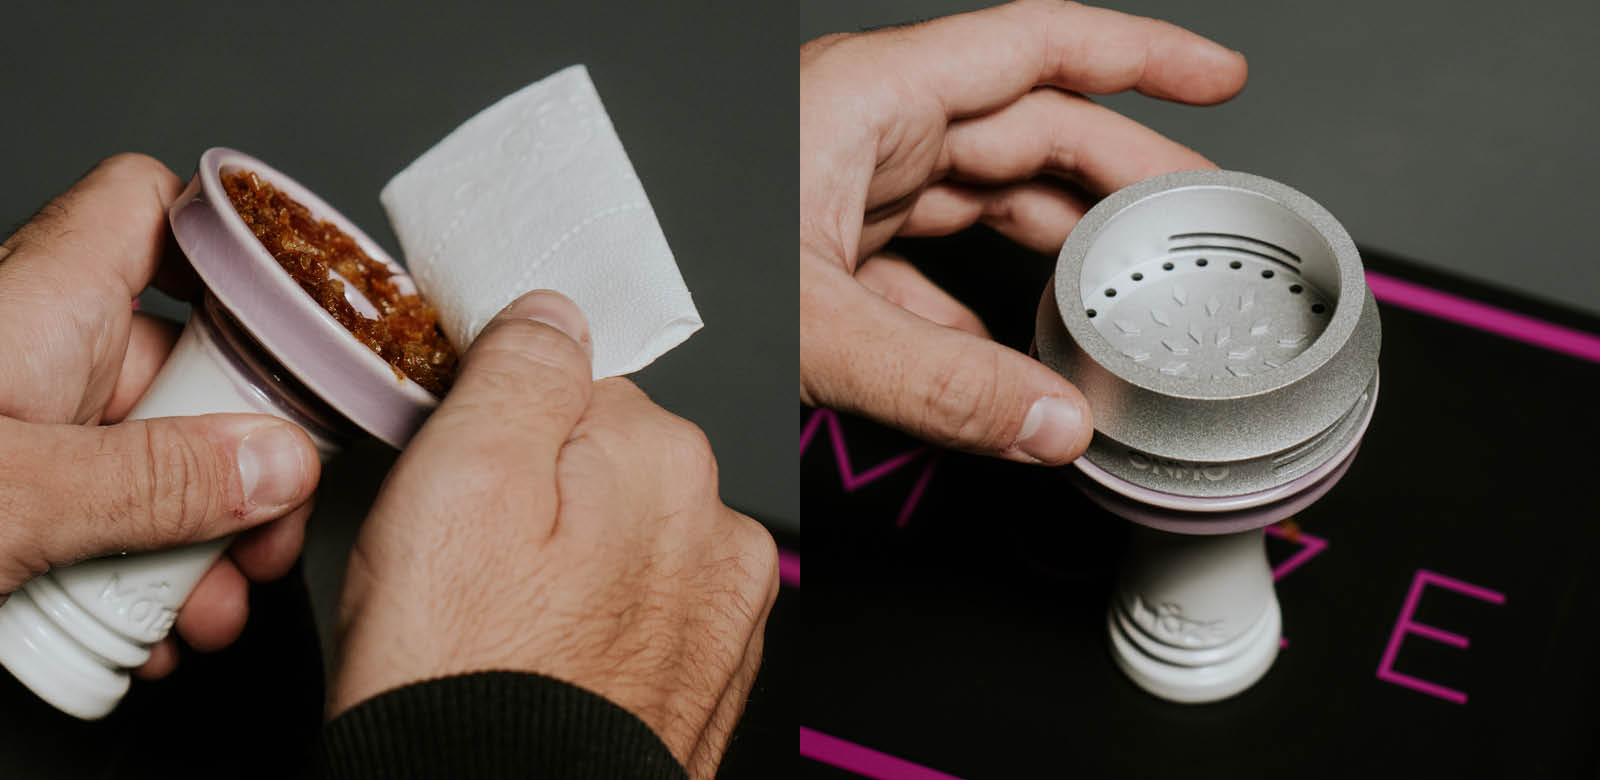
Clean the bowl and place the smokebox. We recommend the ONMO HMD.
In 2017, when most hookah smokers still used classic clay or stone bowls, Brazilian tobacco brand Zomo sparked a shift. By showcasing their tobacco with phunnels and foil at trade shows, more smokers started using this method at home.
Initially, small phunnels like the HookahJohn 80ft were used, but larger versions (now often paired with smokeboxes) became popular. Here’s how to prepare this setup:
After stirring, spread the tobacco loosely in the phunnel. Fill it just below or up to the rim.
Distribute the tobacco loosely in the phunnel
Use either hookah armored foil or 4 layers of household foil. Stretch the foil tightly over the bowl—this takes practice with a phunnel.
Hold the foil on one side against the bowl’s shaft and pull it taut with your thumb and forefinger on the opposite side. Repeat around the edges for a tight fit.
Next, poke holes in the foil. Avoid the center (where the phunnel hole is) since air drawn there won’t pass through the tobacco. Use a hookah poker, toothpick, or skewer.
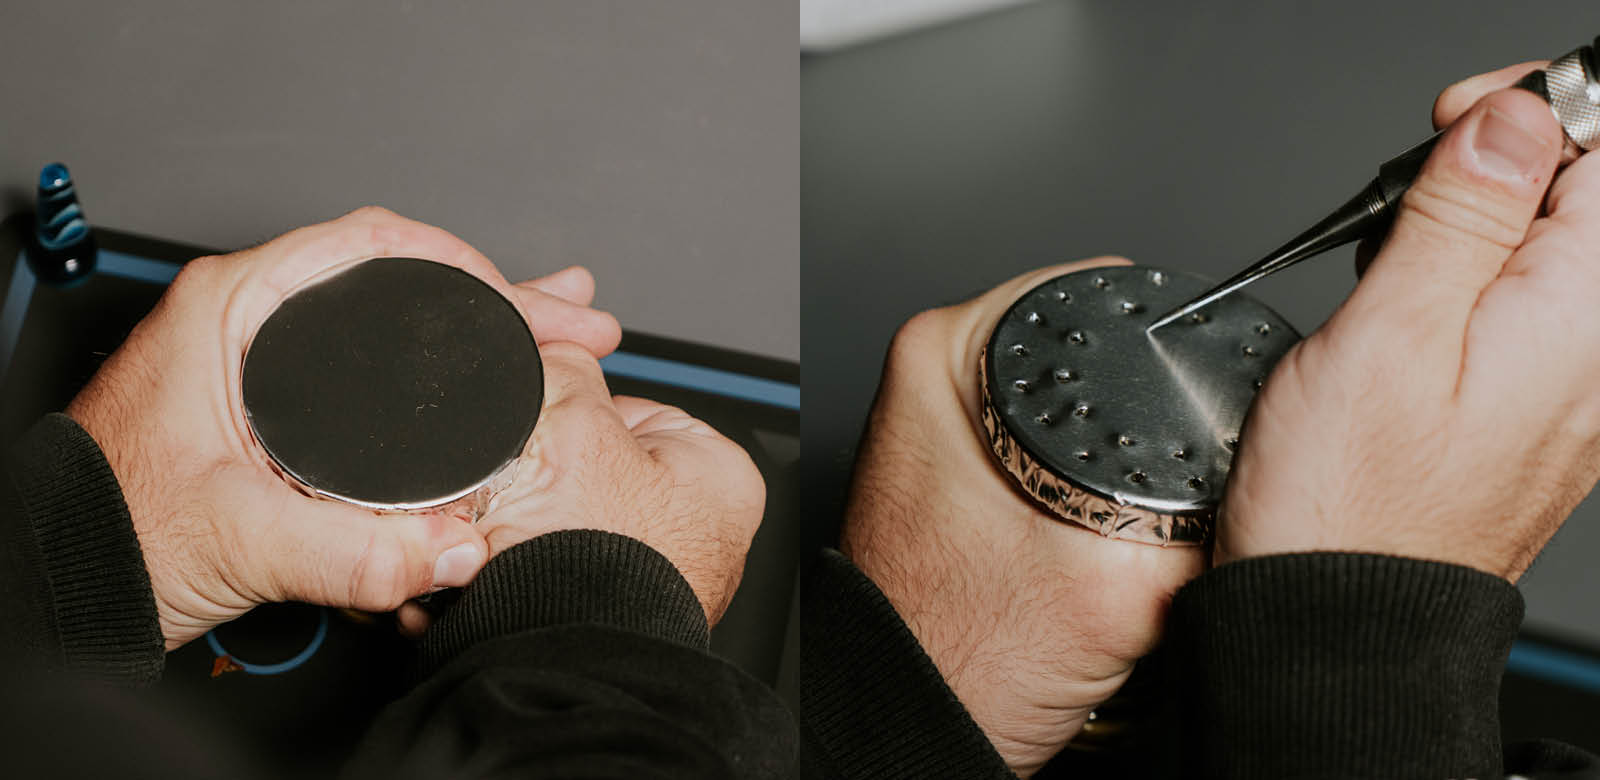
Leave the center holes free on a phunnel
Finally, attach the phunnel to your hookah and place the coals on the foil. For better heat control, you can place a chimney screen on the foil and position the coals on it. This provides more flexibility to adjust coal placement and keeps them secure. Then, enjoy your hookah!
If you’ve ever been to a hookah bar in Russia or the Czech Republic, you’ve likely seen this setup. In these countries, hookahs are typically smoked with a traditional bowl and smokebox.
The tobacco should be placed differently than with a chimney or foil setup. The most common bowls for this are the Voskurimsya Mumiya and the UPG Standard bowl, though a classic clay bowl also works.
This setup is ideal for dark-blend tobacco (e.g., Darkside or Blackburn) but can also be used with Virginia tobacco.
Leave a few millimeters of space between the tobacco and the smokebox base. At most, allow slight contact between the HMD’s nubs/bars and the tobacco.
Some smokers lightly press the tobacco, but this is a matter of preference. If you do, leave a small central hole for better airflow.

Leave a small hole in the tobacco for better airflow.
Once the bowl is ready, attach it to your hookah and place the HMD on top. Add the coals and wait 6–8 minutes (longer than with a phunnel due to greater distance). Avoid “pre-heating” the bowl.
Here are some universal rules:
We offer a wide range of tools to simplify bowl packing and cleanup, including packing tools, mats, and phunnel plugs! Learn more in our dedicated article:
Hookah bowl tools explained
If you decide to purchase any products after reviewing their functions, you can order them from us, with delivery as fast as the next business day!
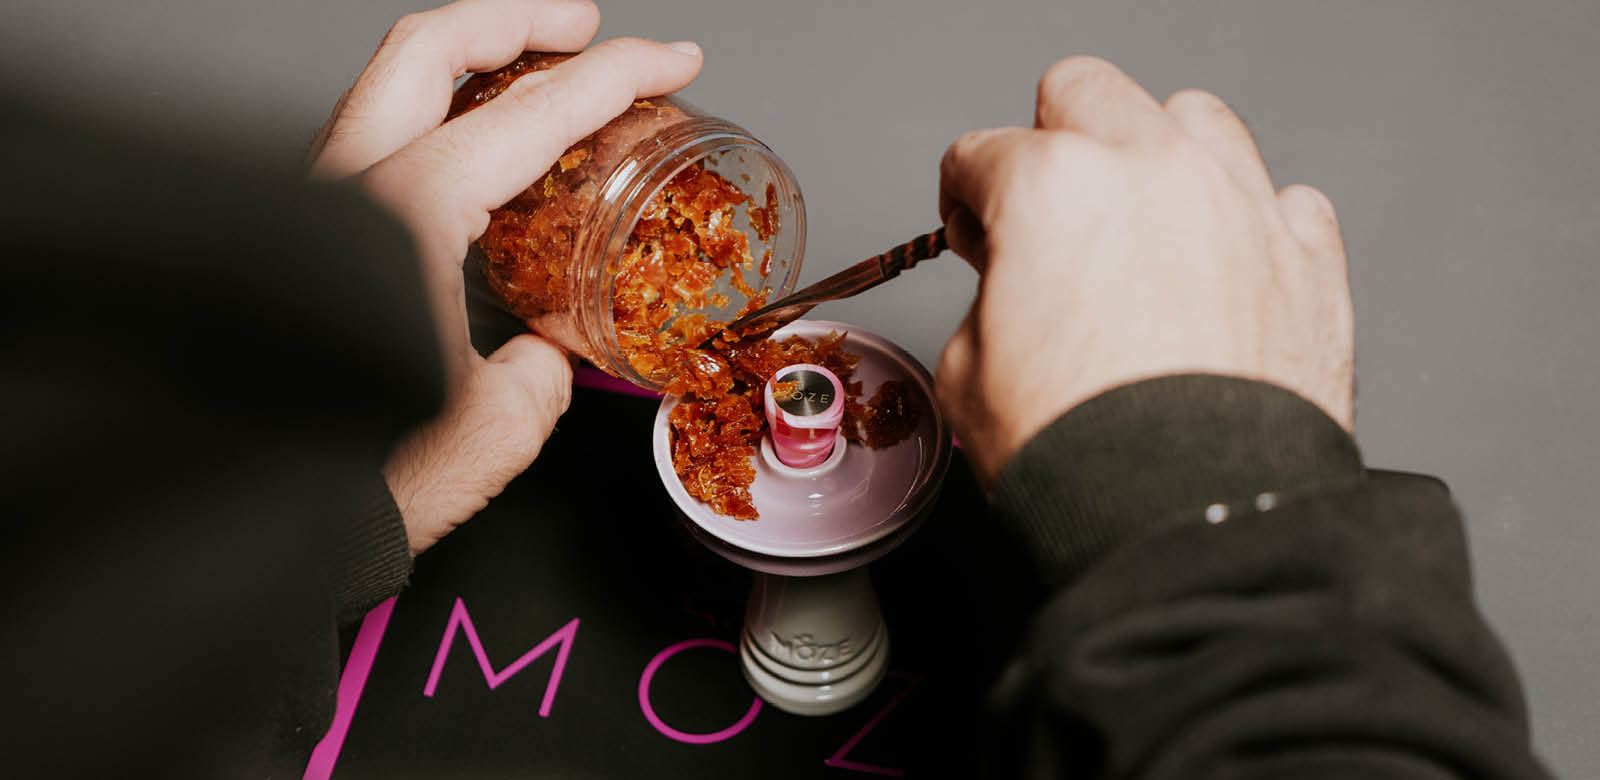
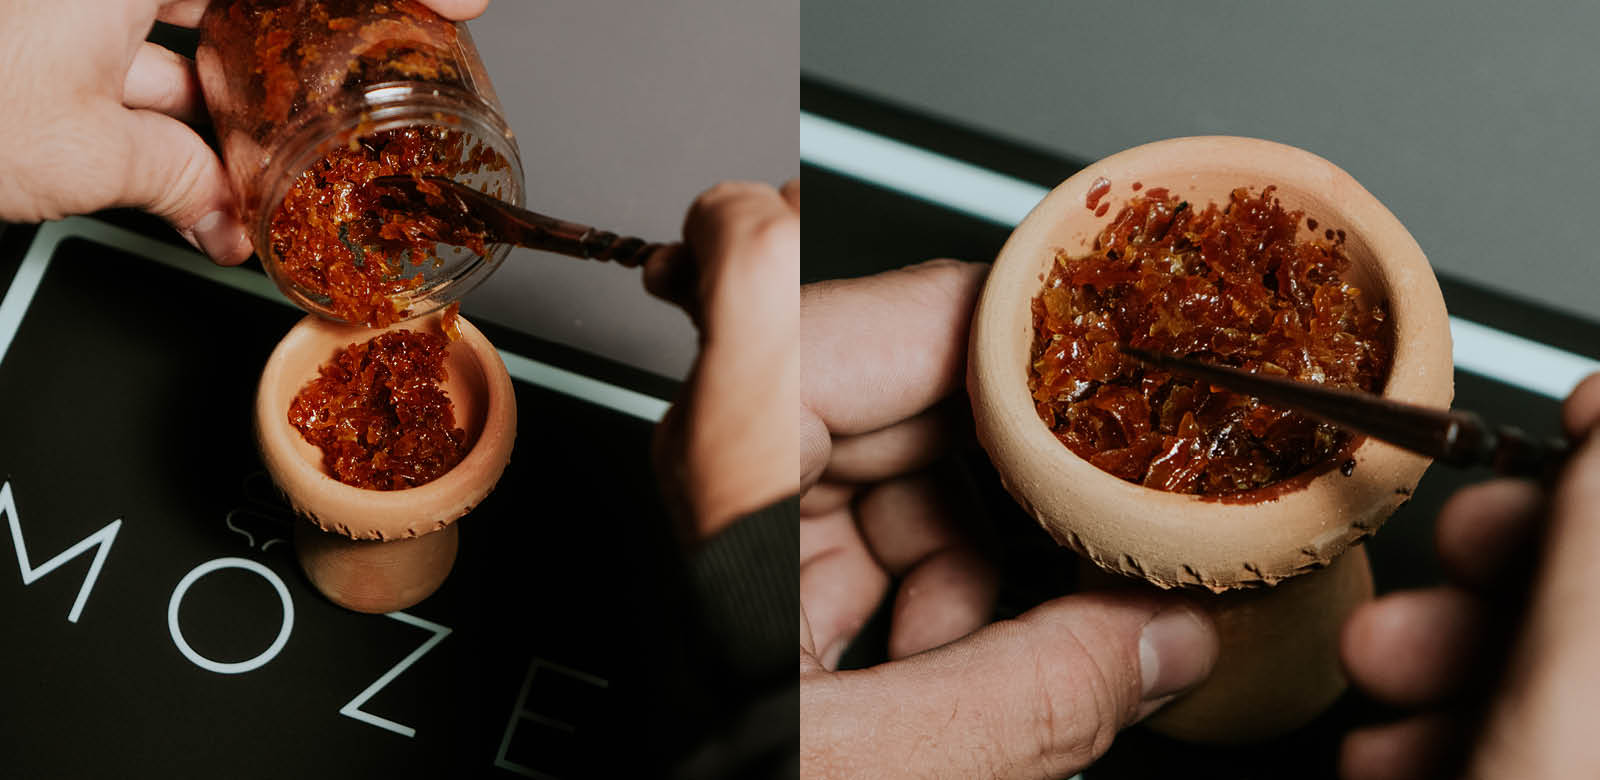
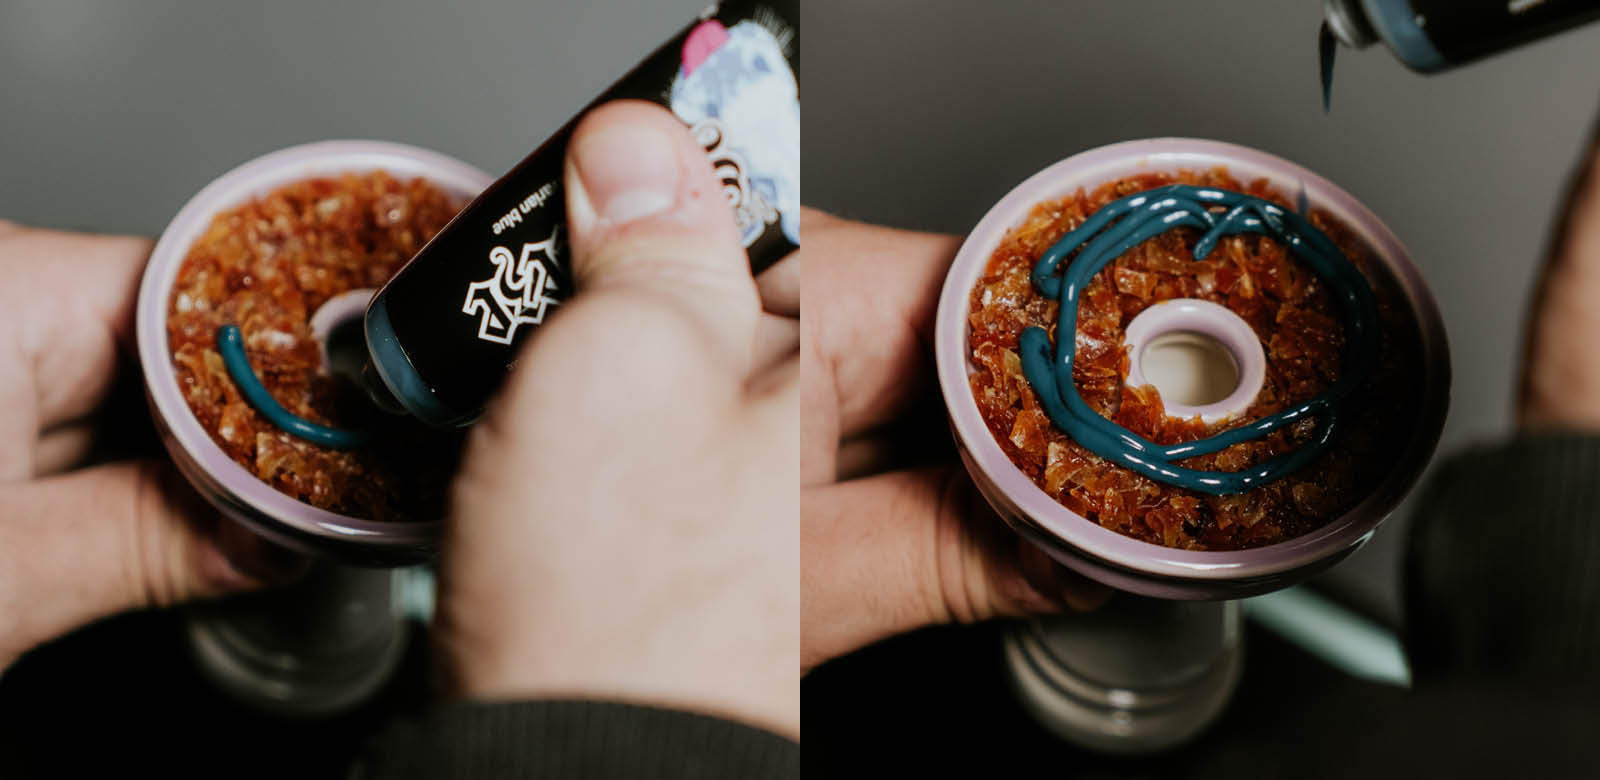
The previous sections focused on hookah tobacco, but there are alternatives like Hookahsqueeze steam paste—a nicotine-free option. This paste can be smoked alone or mixed with tobacco. Here’s how to prepare it optimally.
We recommend a phunnel for pure steam paste use. Spread the paste across the bowl’s interior, avoiding the central hole.
Adjust the paste thickness, but don’t exceed half the height of the phunnel hole to prevent paste from dripping into it and ensure even consumption.
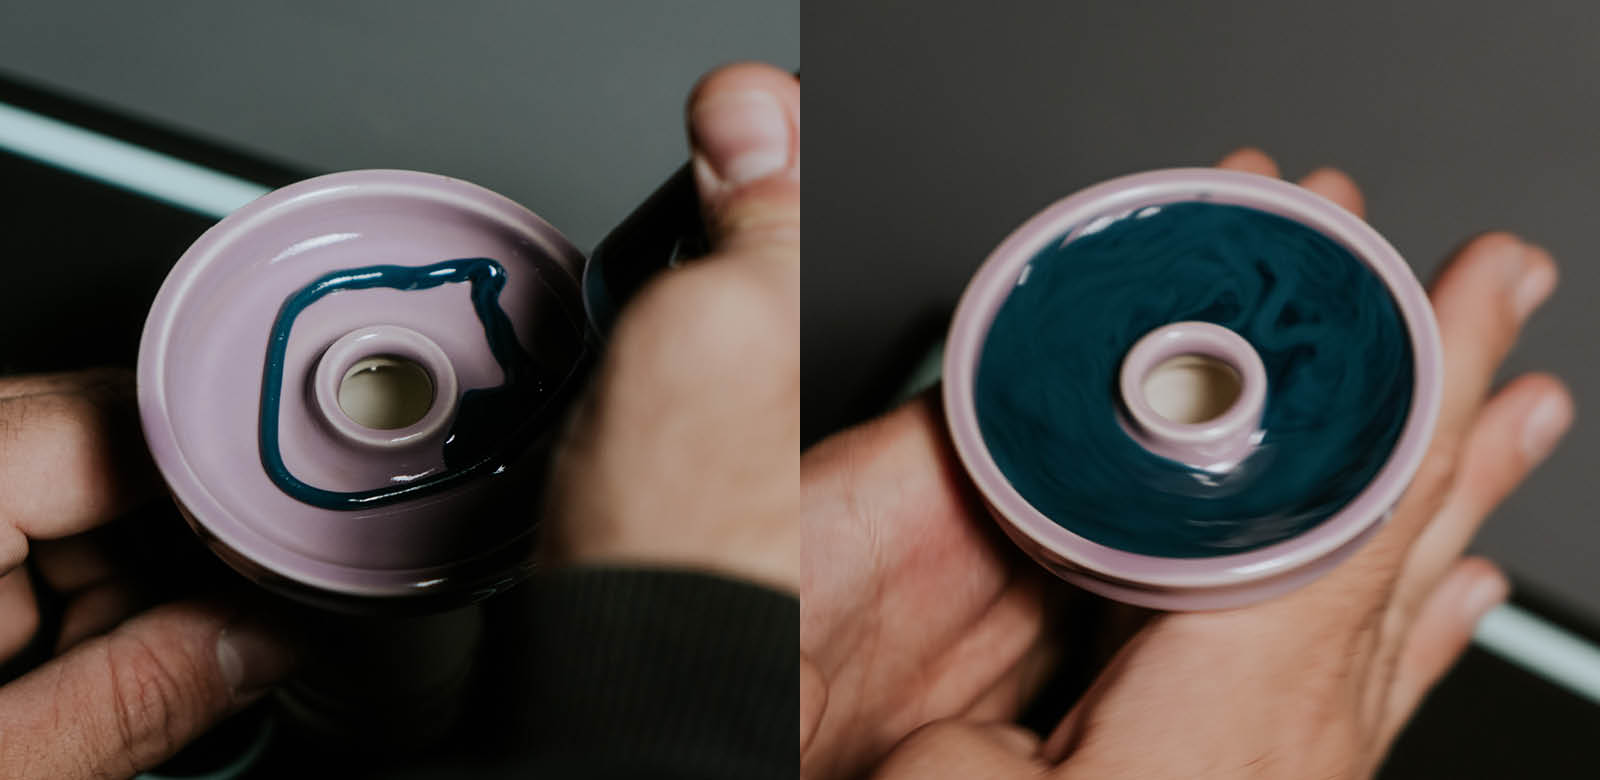
Rotate the phunnel between your hands to distribute the paste evenly.
For a mix, create a base layer of steam paste and add tobacco on top. Alternatively, build a normal tobacco bowl and add a bit of Hookahsqueeze on top.
This lets you control which flavor dominates—tobacco for the first method, steam paste for the second.
Hookahsqueeze steam paste is the nicotine-free alternative to hookah tobacco.
If you have more questions about bowl packing or want our tips on mixing ratios and recommendations, feel free to contact us anytime. We’re happy to help!
The phunnel bowl combined with a heat management device (HMD) generally delivers the best flavor and the densest smoke. Models like the ONMO HMD or Kaloud Lotus are especially recommended.
Loosely fill the bowl with tobacco – roughly up to the rim but not above it. For phunnel bowls, slight contact with the HMD is recommended, but pressing down should be avoided.
The foil should be stretched tightly over the bowl so that it doesn’t sag when drawing. For phunnel bowls: do not poke holes in the center (above the hole).
Start with less charcoal and increase if needed. Too much heat can burn the tobacco and ruin the flavor. Wait 2–3 minutes after placing the charcoal before drawing.
Yes, steam paste like Hookahsqueeze can be used alone or mixed with tobacco. For solo use, a phunnel bowl is ideal. When combining both, the order of layers influences which flavor dominates.